Prerequisites
Brief Explanation of OAuth 2.0
OAuth 2.0 is an authentication standard whose goal is to allow 3rd party applications to access authorized resources from a provider. It relies on the user explicitly granting access to the 3rd party application to issue a token on behalf of the OAuth 2.0 provider for authorized use.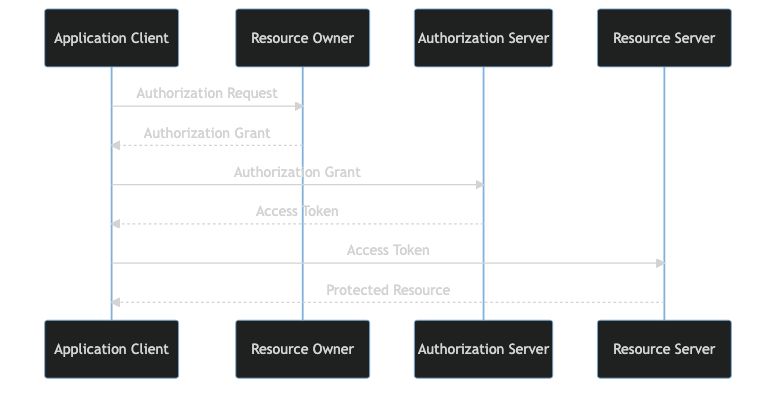 In comparison to OIDC, OAuth 2.0 doesn’t have an identity standard, so retrieving identity can vary drastically from provider to provider. Therefore, it’s up to the user to consult the OAuth 2.0 provider’s documentation to understand if and how identity information can be retrieved.
Creating a GitHub OAuth 2.0 Application
-
Navigate to your GitHub account, and click on
Settingsunder the menu of your Profile icon -
At the bottom of the menu on the left, click on the menu option titled
Developer Settings -
This should bring you to a page that has
OAuth Appsas a menu option on the left, click on that and clickNew OAuth Appto start creating the application - You should be brought to a page that looks like the image below, and can start filling out the information:
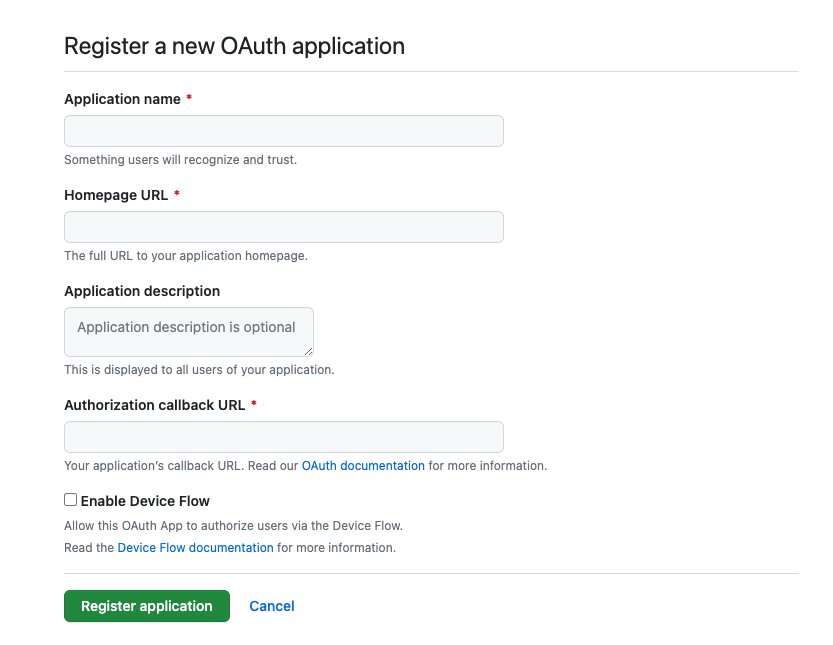
Application Name: Give your application a meaningful nameHomepage URL: Usually Flipt will be used internally by organizations, so this value depends on how you plan to expose Flipt. When in doubt you can just use the URL to your organization’s home pageAuthorization callback URL: This value requires a publicly accessible endpoint on the internet. Thankfully, there are tools such as ngrok that will allow public traffic to an application running locally. Since we will be running Flipt in a Docker container locally, you can fire upngrokand point it to port 8080 on your local machine, with the following command:
ngrok provides, and append /auth/v1/method/github/callback to it. This will be the value you should put for the callback URL. (e.g. https://36f1-2600-1700-1d64-daa0-444c-3f7e-ceb7-3825.ngrok-free.app/auth/v1/method/github/callback).
We’re using
ngrok here for illustration purposes. In a production setting,
you would use whichever publicly accessible domain name you have configured
for your Flipt deployment. These values can always be changed later after the
creation of the application.- Retrieve the
Client IDandClient Secretfrom the created OAuth 2.0 app
Generate a new client secret button (it may ask you to authenticate again with GitHub).
Running Flipt
1. Define a Flipt config.yml
Flipt relies on configuration that the user provides for many bits of functionality. To enable the Login With GitHub feature, you must define a configuration file config.yml with certain fields and values.
The configuration documentation gives a complete list of all configuration values available for how to configure Flipt.
The Authentication Methods: GitHub section of the configuration documentation describes the values needed to enable the Login with GitHub functionality.
It should look similar to the following:
client_id and client_secret are going to be the values from your GitHub OAuth application. The redirect_address will be the ngrok URL with no path (e.g. https://36f1-2600-1700-1d64-daa0-444c-3f7e-ceb7-3825.ngrok-free.app). The scopes are entirely dependent on what level of access you would like the returned GitHub access token to have. The GitHub documentation describes a list of valid scopes.
The last bit of configuration is the session details. In order for the browser to establish a session to communicate with Flipt in an authenticated way, you must provide access details in an HTTP cookie whose value is a static token created by Flipt. This static token is created during the GitHub OAuth 2.0 flow, and associated with the GitHub metadata retrieved from the GitHub API with the access token. The domain value will specify which host can receive the cookie. Since we only care about the host serving Flipt, you can provide the ngrok URL value but without the https:// prefix (e.g. 36f1-2600-1700-1d64-daa0-444c-3f7e-ceb7-3825.ngrok-free.app).
2. Run Flipt as a Docker container
config.yml as a volume in the container, and Flipt will use that configuration as it’s provided as a command line flag option.
3. Navigate to the Flipt UI
Access the Flipt UI by typing in thengrok URL in the address bar of a browser. You should see the following screen:
 Click the button to Login With GitHub, and it should take you to the GitHub domain to complete the authentication flow with the following screen:
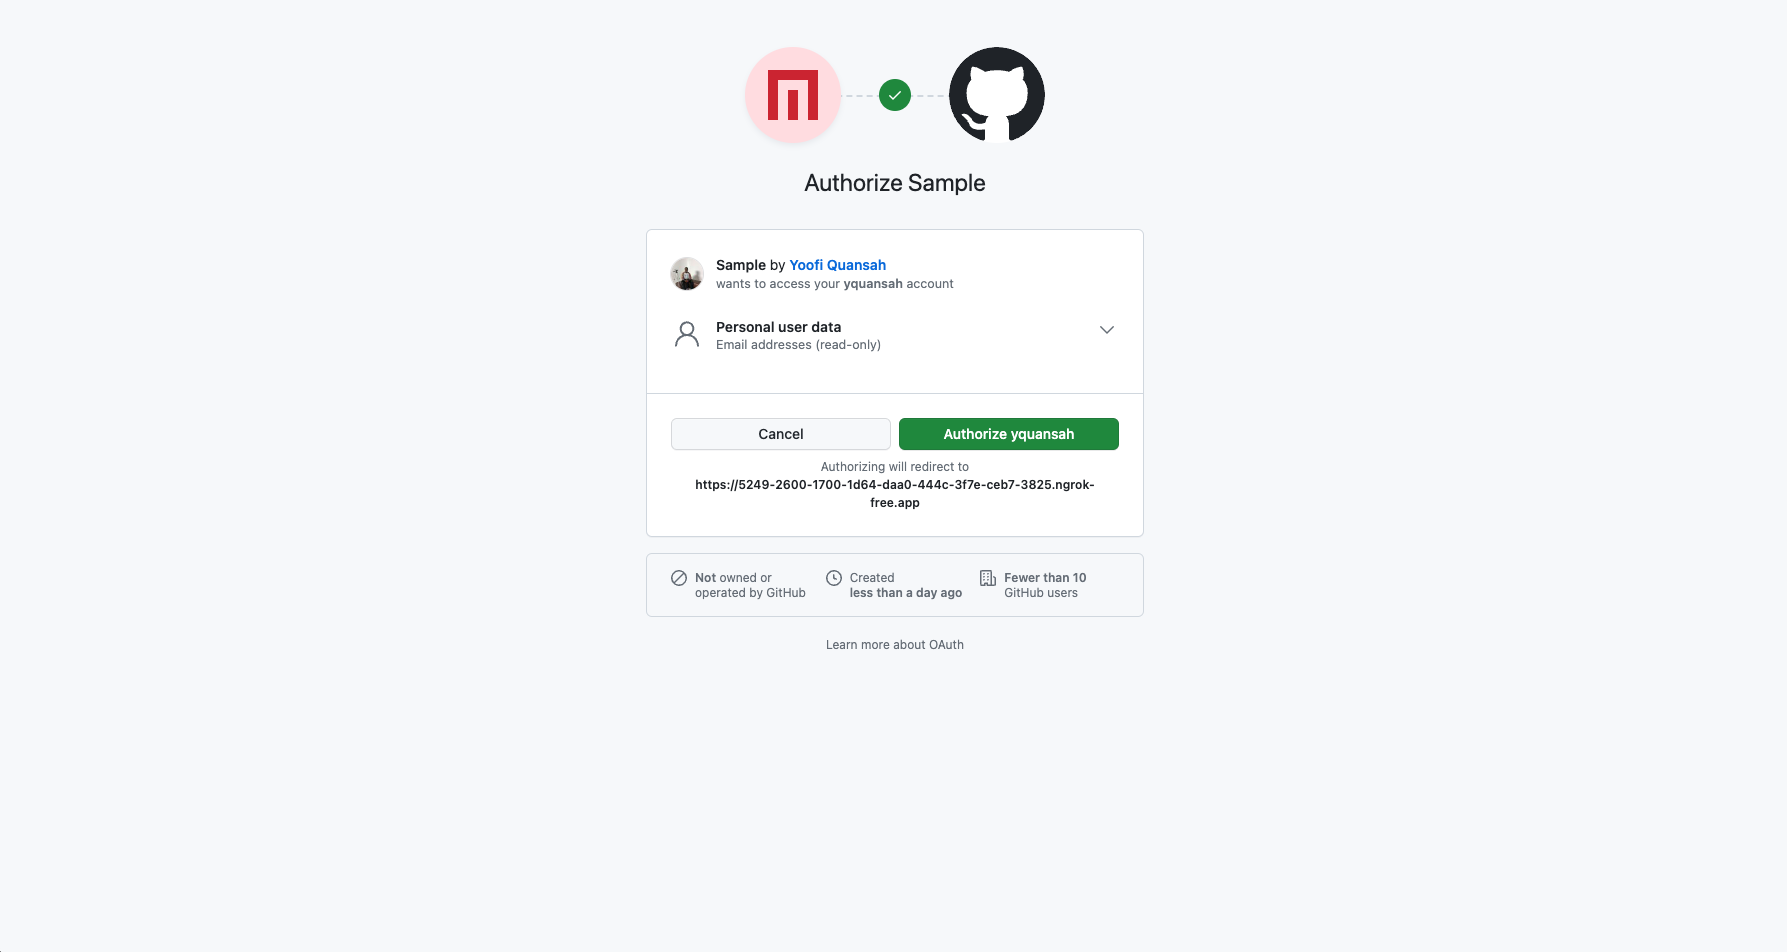 Click on the green
 Authorize {username} button to allow completion of the OAuth 2.0 flow
Conclusion
After completion of the flow you should be taken to the normal Flipt homepage and start using Flipt normally as before. If you have a profile picture on GitHub, it should show in the top right corner. This guide shows the basics of getting Flipt running with GitHub OAuth 2.0 authentication in a development setting using
 ngrok.
Now that you know the basics, you can tailor the configuration pieces to fit your exact use cases. For instance, you would not use ngrok in a production setting, but rather a custom domain. If you have a custom domain, you can modify the Authorization Callback URL value on the GitHub OAuth application page, the redirect_address, and domain configuration values for the Flipt configuration.